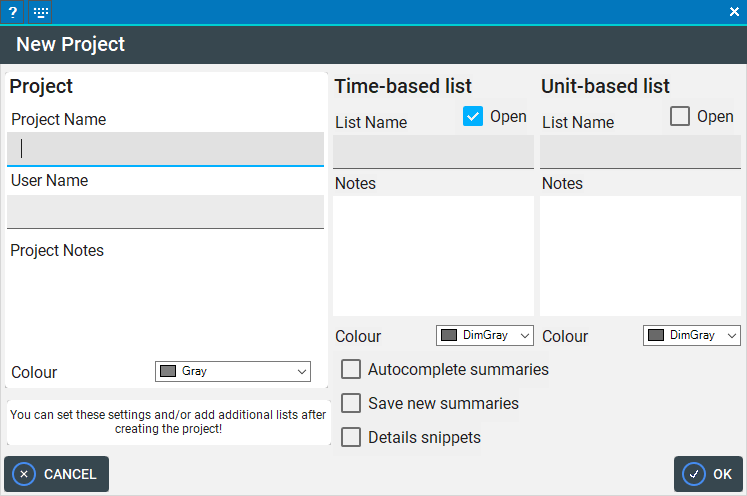
The New Project dialog appears when you click New Project in the Welcome Center.
Keeping Time uses a project format, where any project is completely standalone and contains all its information in one file.
A project can contain an unlimited number of timelists and unitlists.
When creating a new project, an empty Timelist and Unitlist are both created, so your project is ready for anything you throw at it!
You can set the properties of the first list of each type here and you can add additional lists any time later in the Project Window or List Window.
Keeping Time's main aim is to let you choose your workflow.
For this reason, the special thing about the New Project dialog is that you do not need to enter anything here if you do not want to!
All fields are optional; just fill out the ones you need!
By default a timelist will automatically open, so if that's what you need simply click OK and you'll be taken right to your new list after choosing a file location.
Project
In this area you can set the properties of your new project.
Project Name
Give a name to your project. If you do not enter something here, the filename of your project will be used in the UI.
User Name
If you want to enter the user name of the list (for example your name, or the name of an employee you're tracking), you can do that here.
Project Notes
Enter anything you want to write about this project. You can view and edit these notes later in the Project Window.
Colour
Here you can set a colour for the project that will be displayed in various places in the UI to help you differentiate between different projects.
Time-based/Unit-based Lists
In this area you can set the properties of your first list of any type.
Open List Window
If this is checked, the respective List Window for the list type will be opened automatically after creating the project. If you do not check it, the window won't open, but of course you can open it yourself whenever you want!
List Name
Give a name to your list.
List Notes
Enter anything you want to write about this list. You can view and edit these notes later in the List Window.
List Colour
Here you can set a colour for the list that will be displayed in various places in the UI to help you differentiate between different lists.
Autocomplete summaries
If checked, the Summaries textbox when making a new entry or editing an existing one will autocomplete with previously saved summaries.
Save new summaries
If checked, when making a new entry, its summary will be added to the pool of autocomplete values if it does not already exist. You can manage saved summaries in Manage Project/Autocomplete.
Details snippets
If checked, pressing Ctrl-Space when in a Details textbox during entering or editing an entry, will call up a popover with saved Details Snippets.