The Project Window is where your project lives.
There's one such window per open project; you can minimize or hide it, but the project will close if you close this window.
General
Timelists/Unitlists
These buttons show/hide the respective List Window.
Tools
In the Tools menu you can export all lists in the project to CSV files, export a template, and much more.
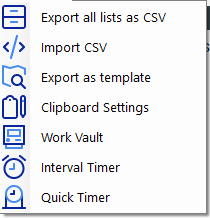
Export all lists as CSV
Exports all lists of this list type as individual CSV files which can be opened with any application that reads CSV.
Import CSV
Opens the CSV Import dialog, where you can import CSV data into the current list or the Work Vault.
Export as template
Exports the current project as a new Project Template.
Clipboard Settings
Opens the Clipboard Settings dialog to set the export patterns when using Copy to Clipboard.
Work Vault
Opens the Work Vault.
Interval Timer
Opens the Interval Timer.
Quick Timer
Opens the Quick Timer.
On Top
If checked, the project window will stay on top of all other windows on the system.
Properties
This button shows/hides the lower part of the window, which contains the project properties, attachments and project targets.
Hide
The Hide button will hide the Project Window. If it is hidden, the List Window shows a button to make it visible again.
Close
This button closes the project, along with any open List Windows.
Save
Save the project with this button.
Lock
If Lock is enabled in the Settings, the lock icon in the title bar will lock Keeping Time.
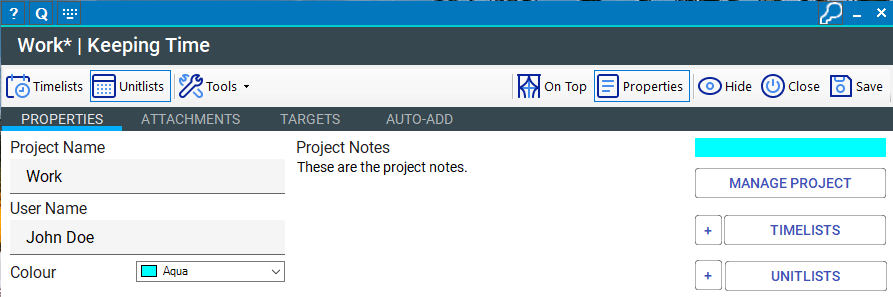
Project Properties Tab
Project Name, User Name, Colour and Notes
You can set these project properties here. As always, all entries are completely optional!
Manage Project
This button shows the Manage Project/Autocomplete dialog, where you can manage autocomplete settings, Details Snippets and, as well as entry templates.
Manage Timelists
This button shows the Manage Lists dialog, where you can add, move, or remove lists.
The + button adds a new Timelist directly. If the list window is open, the newly created list will be shown directly.
Manage Unitlists
This button shows the Manage Lists dialog, where you can add, move, or remove lists.
The + button adds a new Unitlist directly. If the list window is open, the newly created list will be shown directly.
Project Attachments Tab
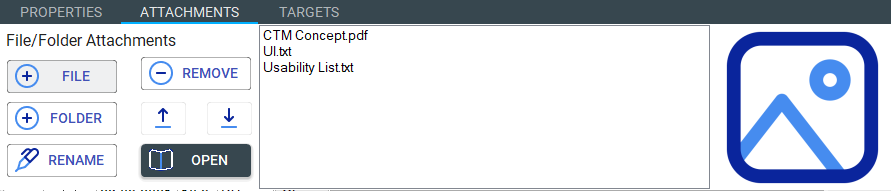
In the Attachments tab, you can link files and folders to the project.
These attachments are not physically copied to the project, but remain at wherever you add them from.
You can also add a single image as a project image, which will be opened in a larger window when clicked. That's super useful for a picture of a work schedule or similar. Or simply use a picture representing the project.
File/Folder
These buttons add files/folders to the attachments.
Rename
Rename the selected attachment. Note that this does not rename the file itself, just how it is referred to within Keeping Time. That's useful if you have auto-generated files with non-descriptive file names.
Remove
Removes the selected attachment(s) from the list.
Up/Down
Moves the selected attachment up or down.
Open
Opens the selected attachment(s) in their default application.
Project Image
Here you can link an image file to the project. It will be shown as a thumbnail and clicking on it will open a larger viewer with the full timage.
Project Targets Tab
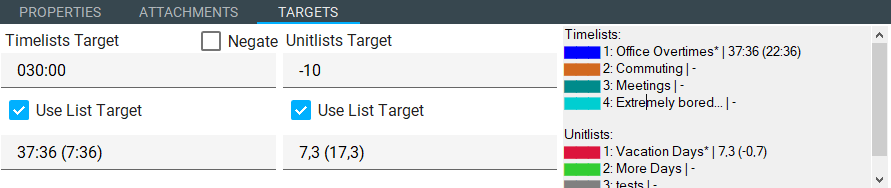
In the Targets tab, you can set targets for all lists of the project combined. If for example your project contains one list per employee, you can set a list target for all work of those people combined.
Targets are calculated against the list totals from the respective lists. These take into account the offset, if one is set (see List Window) and will also show the list target calculation (if a list target is set).
Timelists Target
Here you can set a target for all timelists of the project combined. You can set up to 999 hours and 59 minutes.
Negate
Use the Negate checkbox if the target should be negative.
Unitlist Target
Here you can set a target for all unitlists of the project combined. You can set an positive or negative floating point numbers.
Use List Target
Check this box if you want the target entered above to be used for calculation.
Target Area
The target area shows the target calculation based on the targets set above.
List Details
In the list details area, you can ee the individual list with their totals and target calculations.
Auto-Add Tab
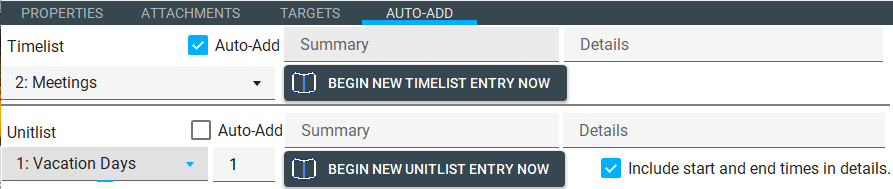
The Auto-Add tab lets you configure Keeping Time to automatically start recording an entry into your project as soon as you load it. This is ideal for attendance; just put Keeping Time in your autostart and it will begin recording when you start up your computer.
You can record into one list of each type simultaneously; or just into a single list of one type.
Note that contrary to "Record time" in a timelist, or "Add entry", Auto-Add will NOT show you the Add Entry dialog and ask you for confirmation after stopping the timer. It will directly commit the entry with the chosen settings! This is by design.
Most fields are duplicated for timelists and unitlists, so these are only listed once in the following section:
Auto-Add
Check this box if you want Keeping Time to automatically begin recording an entry into the chosen list when opening the project.
Make sure all other fields are set correctly before saving and quitting the project!
List picker
Pick the list you want to record the entry into.
Value (unitlist only)
Pick the value that should be recorded into the list; you can of course change it any time later, even if an entry is still recording.
Summary
Enter the summary that will be used.
Details
Enter the details that will be used.
Begin new entry now
Click this button to begin recording a new entry immediately with the chosen settings.
Generally you will only need to do this when you first set up Auto-Add, as otherwise it would start automatically when opening the project (that's the point, after all).
Include start and end times in details (unitlist only)
if checked, the start and end times will be appended to the details field in the entry. This only applies to unitlists, as timelists obviously have dedicated fields for this information anyway.